django MQ 시리즈 1편 - task queue (1) : Asynchronous Tasks With Django and Celery
1. django MQ 시리즈 1편 - task queue (1) : Asynchronous Tasks With Django and Celery
2. django MQ 시리즈 2편 - task queue (2) : Learn Django Celery with RabbitMQ
3. django MQ 시리즈 3편 - task queue (3) : Custom Study Project
4. django MQ 시리즈 4편 - celery with redis for pub/sub
해당 포스팅은 django 기반의 기본적인 MQ(message queue)와 pub/sub MQ(message queue) 학습을 위해 작성된다.
관련 자료는 github 저장소에 저장되며 지속적으로 업데이트 된다.
https://github.com/bluebamus/django-mq-series
GitHub - bluebamus/django-mq-series: This repository covers mq and pus/sub learning projects for redis, rabbitmq, kafka, nats, e
This repository covers mq and pus/sub learning projects for redis, rabbitmq, kafka, nats, etc. - GitHub - bluebamus/django-mq-series: This repository covers mq and pus/sub learning projects for red...
github.com
* 1번 시리즈는 저작권 문제로 Asynchronous Tasks With Django and Celery 링크의 중간에 있는 소스 다운받기를 통해 원 소스를 메일로 받을 수 있기에 github 저장소에 포함되지 않아 있다.
간단하게 기본 message queue와 pub/sub message queue의 차이를 정의하고자 한다.
일반적으로 mq는 하나의 list 형태 혹은 dict라 보면 된다
* 대부분 list 형이라 말하지만, 사실 솔루션을 사용하게 되면 해시, 시간 값 등으로 이루어진
key가 결합되는 경우가 일반적이기 때문에 dict를 언급했다.
기본적으로 제일 먼저 들어온 메시지가 제일 먼저 나간다.
큐를 기본적으로 이해한다는 전제하에
메시지 큐는 app-server에서 작업을 처리하는데 필요한 데이터셑이라 생각하면 좋겠다.
예를 들어 대용량 메일을 보내는 경우 mq에 사용자/사용자그룹 정보를 넣으면
순차적으로 worker가 해당 데이터를 가져가면서 처리하게 된다.
그렇다면 pub/sub은 무엇인가?
여러 목적의 app-server들이 존재할 경우, 하나의 메시지가 모든 그룹 혹은 특정 그룹
혹은 하나의 서버에게만 작업을 요청해야 하는 경우가 있을 것이다.
예를 들어 서버의 배치작업은 특정 시간에 모든 서버가 해야할 작업일 것이고
메일 송신은 특정 서버군들만 하면 될 것이고
특정 사용자의 단일 처리는 하나의 서버만 수신 받으면 될 것이다.
이렇게 분산된 서버군들의 다양한 목적으로 분배된 큐가 있고
보다 정확하게 메시지를 수신받고 큐에 배분하며
큐의 최대용량을 넘었을 경우의 메시지를 따로 관리하며
사용자들의 수신 방법들을 관리하는 라우터가 있는 mq 형태를
pub/sub mq라 부른다고 쉽게 이해를 하면 된다.
물론 다양한 솔루션이 있는 만큼, 그 특징도 각기각색이다.
간단한 기능만 제공하는 redis pus/sub에서
처리량은 낮지만 보다 다양한 기능을 제공하는 rabbitMQ,
애초에 분산 시스템을 목적으로 데이터 무손실을 목표로 하는 kafka,
기존 pub/sub mq중 단일 처리량이 제일 높게 평가된 최신 공개된 nats.io
사실 각 솔루션들의 목적이 명확한만큼 목적에 맞는 솔루션을 사용하는게 중요하다.
예를 들어 kafka는 rabbitMQ보다 구현 과정이 어렵고, 부족한 기능을 보완하기 위한
개발코드가 많이 늘어난다는 것과 학습 커브가 높다는 문제가 있기에
굳이 당장의 메시지 처리량이 놓지 않다면
차라리 redis 혹은 rabbitMQ가 더 훌륭한 선택이 될수도 있다.
사실 근래 사용가능한 하드웨어 스펙으로 보았을 때
스케일업과 스케일아웃 사이에서 분산시스템을 고려해야 한다는 가정 하에
처음부터 급작스럽게 요구되는 경우가 거의 없을거라 생각된다.
프로젝트는 다음 사이트를 기반으로 학습하였다.
Asynchronous Tasks With Django and Celery
https://realpython.com/asynchronous-tasks-with-django-and-celery/
Asynchronous Tasks With Django and Celery – Real Python
In this tutorial, you'll learn how to integrate Celery and Django using Redis as a message broker. You'll refactor the synchronous email sending functionality of an existing Django app into an asynchronous task that you'll run with Celery instead.
realpython.com
* 관련한 소스는 상위 페이지의 중간에 있는 링크를 통해 메일로 받을 수 있다. (시간이 걸림)
* 주요 항목들은 celery 공식 페이지 참고
https://docs.celeryq.dev/en/stable/django/first-steps-with-django.html
First steps with Django — Celery 5.2.7 documentation
This document describes the current stable version of Celery (5.2). For development docs, go here. First steps with Django Using Celery with Django Note Previous versions of Celery required a separate library to work with Django, but since 3.1 this is no l
docs.celeryq.dev
셀러리를 사용하는 목적으로 크게 두가지를 꼽을 수 있다.
1. 앱에서 독립적으로 실행할 수 있는 분산 프로세스로 Offloading work(짐을 덜어내는 작업)을 수행함
2. 특정 시간에 작업 실행을 예약함, 때로는 반복하는 이벤트에 사용함
스스로 "실시간 처리에 중점을 두고 작업 스케줄링도 지원하는 작업 대기열"로 정의함
상위 두 기능은 celery의 기능이지만 별도로 구분되어진다.
1. celery workers : 기본 서비스 컨텍스트 외부에서 서로 독립적으로 작업을 실행하는 작업자 프로세스
2. celery beat : 작업 실행 시기를 조율하는 스케줄러, 정지적인 작업 예약시 사용 가능
celery worker는 셀러리의 핵심으로 celery beat을 사용하더라도 결국 celery workers가 지시 사항을 선택하고
예약된 시간에 수행된다.
* celery beat을 이용하여 주기적인 작업을 할 필요가 있는 경우 다음 페이지를 참고하자
https://docs.celeryq.dev/en/stable/userguide/periodic-tasks.html
Periodic Tasks — Celery 5.2.7 documentation
This document describes the current stable version of Celery (5.2). For development docs, go here. Periodic Tasks celery beat is a scheduler; It kicks off tasks at regular intervals, that are then executed by available worker nodes in the cluster. By defau
docs.celeryq.dev
celery 활용 방안:
- 이메일 보내기
- 이미지 전처리 (업로드시)
- 텍스트 처리 (텍스트의 욕설, 비용인된 문구 등 사용을 후처리)
- api 호출 및 기타 웹 요청 / 스크래핑
- 데이터 분석
- 머린 러닝 모델 실행
- 보고서 생성
- 작업을 처리하는데 오랜 시간이 필요한 경우
celery command line interface:
-A, --app <app>
-b, --broker <broker>
--result-backend <result_backend>
--loader <loader>
--config <config>
--workdir <workdir>
-C, --no-color
-q, --quiet
--version
reference : https://docs.celeryq.dev/en/stable/reference/cli.html#cmdoption-celery-A
Command Line Interface — Celery 5.2.7 documentation
This document describes the current stable version of Celery (5.2). For development docs, go here. Command Line Interface celery Celery command entrypoint. celery [OPTIONS] COMMAND [ARGS]... Options -A, --app -b, --broker --result-backend --loader --config
docs.celeryq.dev
Celery 애플리케이션 인스턴스를 정의 :
# django_celery/celery.py

import os
from celery import Celery

# 환경변수 설정
# setdefault(A,B)를 사용하여 외부 환경변수에 A 라는 이름으로 B 값을 등록하겠다는 의미
os.environ.setdefault("DJANGO_SETTINGS_MODULE", "django_celery.settings")
# 기본 모듈의 이름을 인수로 제공하여 celery 애플리케이션 인스턴스 생성 : "django_celery".
app = Celery("django_celery")
# 아래 설정으로 복수의 구성 파일을 가질 필요가 없이 django setting에서 celery 설정을 하고 가져올 수 있음
# namespace는 celery 설정 항목을 구분할 식별자 예) CELERY_XXX
# django.config:settings -> module:class
app.config_from_object("django.conf:settings", namespace="CELERY")
# 프로젝트의 모든 앱에서 관련된 작업을 찾도록 지시함
app.autodiscover_tasks()
* 만약 rabbitMQ를 message broker로 사용하고 redis를 results back-end로 사용한다면 다음과 같이 구성 가능
CELERY_BROKER_URL = "amqp://myuser:mypassword@localhost:5672/myvhost"
CELERY_RESULT_BACKEND = "redis://localhost:6379"
* django의 settings.py에 debug가 true로 설정되어 있으면 celery 실행시 워닝이 발생한다
실재 서비스를 운용할 때에는 false로 설정해야 한다.
* celery.app.task와 관련하여 다음 페이지에서 다양한 함수와 지원 사항을 확인할 수 있다.
https://docs.celeryq.dev/en/stable/reference/celery.app.task.html#celery.app.task.Task
celery.app.task — Celery 5.2.7 documentation
This document describes the current stable version of Celery (5.2). For development docs, go here. celery.app.task Task implementation: request context and the task base class. class celery.app.task.Context(*args, **kwargs)[source] Task request variables (
docs.celeryq.dev
* .delay()는 celery에 작업 메시지를 보내는 가장 빠른 방법이다 하지만 이 명령어는 shortcut이라 보면 된다.
좀 더 세밀한 작업을 위하 미세한 조정을 하기 위해서 .apply_async()를 사용할 수 있다.
예시)
send_feedback_email_task.apply_async(args=[
    self.cleaned_data["email"], self.cleaned_data["message"]
    ]
)
reference :
celery.app.task — Celery 5.2.7 documentation
This document describes the current stable version of Celery (5.2). For development docs, go here. celery.app.task Task implementation: request context and the task base class. class celery.app.task.Context(*args, **kwargs)[source] Task request variables (
docs.celeryq.dev
* celery는 실행시 코드가 메모리에 로드된다. 때문에 코드를 변경 할 때마다 celery 작업자를 다시 시작할 필요가 있다.
이를 해결할 수 있는 방법은 아래와 같다
https://docs.djangoproject.com/en/4.0/howto/custom-management-commands/
Django
The web framework for perfectionists with deadlines.
docs.djangoproject.com
https://testdriven.io/courses/django-celery/auto-reload/
The Definitive Guide to Celery and Django - Setting Up Auto-reload
The Definitive Guide to Celery and Django - Setting Up Auto-reload from TestDriven.io
testdriven.io
https://github.com/gorakhargosh/watchdog
GitHub - gorakhargosh/watchdog: Python library and shell utilities to monitor filesystem events.
Python library and shell utilities to monitor filesystem events. - GitHub - gorakhargosh/watchdog: Python library and shell utilities to monitor filesystem events.
github.com
한글 reference :
https://blog.khtinsoft.xyz/posts/django-celery-auto-restart/
Django/Celery 개발 환경 사용 시 Celery Auto Restart (Auto Reload) 적용하기 - Blog by khtinsoft
Django/Celery 개발 환경에서, 소스 파일 수정 시 Celery Auto Restart/Reload 적용하기
blog.khtinsoft.xyz
https://velog.io/@hyeseong-dev/Auto-reload-%EC%84%A4%EC%A0%95
Auto-reload 설정
개요 Live code reloading은 개발자가 코드 변경에 따른 피드백을 즉각적으로 받을 수 있는 간단하면서도 효과적인 방법입니다. Uvicorn의 경우에는 기본적으로 이 기능을 제공하지만 Celery는 제공하지
velog.io
*** 윈도우에서는 celery 4.0부터 지원이 안된다고 한다 아래와 같은 방법을 사용하면 사용 가능하다
pip install gevent

python -m celery -A django_celery worker -l info -P gevent
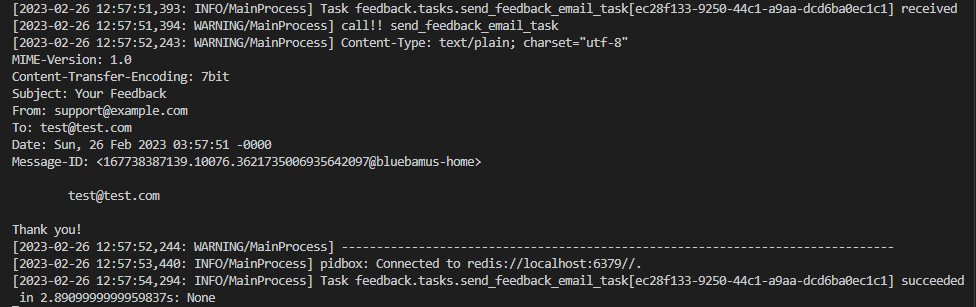
테스트 결과 :
celery 실행 방법들
1. 배포 목적으로 deamon으로 실행
https://docs.celeryq.dev/en/stable/userguide/daemonizing.html#daemonizing
Daemonization — Celery 5.2.7 documentation
This document describes the current stable version of Celery (5.2). For development docs, go here. Daemonization Most Linux distributions these days use systemd for managing the lifecycle of system and user services. You can check if your Linux distributio
docs.celeryq.dev
2. 개발과 디버깅 목적으로 사용
celery -A 앱이름 worker -l 로그레벨
예) celery -A config worker -l INFO
참고 reference :
https://asecurity.dev/entry/Django-Celery-%EA%B5%AC%EC%84%B1%ED%95%98%EA%B8%B0
Django - Celery 구성하기
Python에서 Celery가 비동기 작업 관리로 많이 사용되고 있어, Django 프로젝트에 도입하기 위해서 사용해 보았다. 구성하는 부분에 약간의 정리가 필요하여 해당 내용을 정리할 겸 글을 작성한다. 1.
asecurity.dev
Django - Celery로 비동기 Async Task 구성하기
앞서 진행한 Celery 구성을 통해 간단한 비동기 Task를 예제를 통해 사용해 보고자 한다. 기본적인 Celery를 구성하는 부분은 아래 내용을 참고하기 바란다. Django - Celery 구성하기 (asecurity.dev) Django - C
asecurity.dev
https://lucky516.tistory.com/2
Django에 Celery 적용하기 첫번째
https://docs.celeryproject.org/en/stable/django/first-steps-with-django.html First steps with Django — Celery 5.0.5 documentation docs.celeryproject.org 해당 게시물은 위 주소의 사이트의 내용을 기반으로 합니다. 일부 영양가 없
lucky516.tistory.com
https://lucky516.tistory.com/3
Django에서 Celery 이용하기 두번째
docs.celeryproject.org/en/stable/getting-started/next-steps.html#next-steps Next Steps — Celery 5.0.5 documentation This document describes the current stable version of Celery (5.0). For development docs, go here. Next Steps The First Steps with Celery
lucky516.tistory.com
https://lucky516.tistory.com/18
'Study > django' 카테고리의 다른 글
| django MQ 시리즈 3편 - task queue (3) : Custom Study Project (1) | 2023.03.14 |
|---|---|
| django MQ 시리즈 2편 - task queue (2) :Learn Django Celery with RabbitMQ (0) | 2023.03.08 |
| django에서 redis 사용하기 1편 (캐시 사용: 데이터 / 세션) (1) | 2023.02.16 |
| i18n 다국어 기능 적용하는 방법 (1) | 2023.01.11 |
| django admin - raw_id_fields, search_fields problem (0) | 2022.12.19 |
댓글