[인프런] 실리콘밸리 엔지니어와 함께하는 샐러리(Celery) 학습 정리 1
실리콘밸리 엔지니어와 함께하는 샐러리(Celery) 강의 | 미쿡엔지니어 - 인프런
미쿡엔지니어 | Python Celery를 통해 비동기 작업과 분산 시스템을 마스터하세요! 이론과 실습을 병행하며, 초보자부터 전문가까지 모두에게 필요한 핵심 기술과 최적화 전략을 배울 수 있습니다.
www.inflearn.com
* 해당 강의는 소스제공이 없는걸로 보임.
- 다른 강좌에 포함 : https://github.com/dimz119/learn-python-django
GitHub - dimz119/learn-python-django: learn-django
learn-django. Contribute to dimz119/learn-python-django development by creating an account on GitHub.
github.com
- 저장소가 있었으나 공개가 되지 않았던 것이고, 요청으로 제대로 등록이 됨
- 저장소 : https://github.com/dimz119/learn-celery
* 자체적으로 정리하고 있는 github는 pip 관리가 아닌, poetry를 기본으로 사용함
* 개인 학습용인 만큼 코드의 변경 및 차이가 있음
https://github.com/bluebamus/inflearn-celery-study-silicon-valley
GitHub - bluebamus/inflearn-celery-study-silicon-valley: celery study project in inflearn "실리콘밸리 엔지니어와 함
celery study project in inflearn "실리콘밸리 엔지니어와 함께하는 샐러리(Celery)" - bluebamus/inflearn-celery-study-silicon-valley
github.com
1. 설정 및 기본적인 celery api 사용
- First steps with Django : https://docs.celeryq.dev/en/stable/django/first-steps-with-django.html
- django에서 사용되는 celery.py 설정 파일의 위치는 프로젝트의 settings.py가 존재하는 폴더의 위치가 아닌, app의 위치에 있어도 동작하는데 상관이 없다.
- celery를 실행하면, 메인 프로세스 하나와 queue 작업을 관리하는 설정된 갯수의 worker 프로세서가 생성되고 이후 설정된 갯수의 child process가 생성된다. 기본적으로 work의 갯수는 None 상태로 제한이 없으나 기본적으로 CPU 코어 수와 동일한 수의 worker를 생성한다. child process는 작업의 메모리 사용량에 따라 자동으로 수가 증가, 제거된다.
1) celery 설정
- 강의 내용대로만 따라하면 flower 실행에 에러가 발생한다. docker-compose의 command를 이용해 gunicorn이 아닌 runserver를 동작해야 한다. dockerfile도 이에 맞춰 변경해야 한다.
- celery.py에서 worker 수 정의
- 실행 명령어에서 정의할 수도 있다.
celery -A proj worker --concurrency=4app = Celery("worker")
app.conf.update(
worker_concurrency=4, # worker 개수를 4개로 설정
)
- celery 4 이후부터 window를 지원하지 않는다. celery의 기본 concurrency pool 설정은 prefork를 사용하는데 윈도우는 fork를 지원하지 않는다.
- 해결 방법으로 프로세스의 fork를 허용하는 방식이 있다.
- django의 환경 변수를 추가하거나 사용자 시스템의 환경변수에 참조할 변수를 설정해주면 된다.
import os

from celery import Celery


os.environ.setdefault('DJANGO_SETTINGS_MODULE', 'djangoapi.settings.dev')
os.environ.setdefault('FORKED_BY_MULTIPROCESSING', '1')

app = Celery('miti',
             broker='amqp://miti:miti@localhost/',
             include=['games.tasks'])

app.config_from_object('django.conf:settings', namespace='CELERY')

app.autodiscover_tasks()
- celery에서 사용하는 biliard 패키지는 FORKED_BY_MULTIPROCESSING 환경 변수를 설정하여 process를 fork 한다. 하지만 celery 4 이후 환경 변수 설정을 하지 않기 때문에 문제가 되는 것이다.
- eventlet/gevent 등의 쓰레드 풀을 사용하는 방법
# format : celery -A <project명> worker -l info -P <eventlet or gevent or solo>

celery --app=worker worker -l INFO -P gevent
- cpu의 자원을 많이 필요로 하는 작업의 경우 prefork 방식이 적절하고 I/O이 무거운 작업에는 thread poll이 적절하다.
- 기본 settings.py 설정
pip install celery django-celery-beat pip install django-celery-results
or
poetry add celery django-celery-beat django-celery-results
INSTALLED_APPS = [
...
"django_celery_beat",
"django_celery_results",
]
CELERY_TIMEZONE = TIME_ZONE # 'Asia/Seoul'
CELERY_TASK_TRACK_STARTED = True
CELERY_TASK_TIME_LIMIT = 30 * 60
CELERY_BROKER_URL = os.environ.get("CELERY_BROKER", "redis://127.0.0.1:6379/0")
CELERY_RESULT_BACKEND = os.environ.get("CELERY_BACKEND", "redis://127.0.0.1:6379/0")
# CELERY_BROKER_URL = os.environ.get("CELERY_BROKER", "redis://redis:6379/0") # for docker
# CELERY_RESULT_BACKEND = os.environ.get("CELERY_BACKEND", "redis://redis:6379/0") # for docker
# CELERY_ACCEPT_CONTENT = ['application/json'] # option
# CELERY_RESULT_SERIALIZER = 'json' # option
# CELERY_TASK_SERIALIZER = 'json' # option
# CELERY_ALWAYS_EAGER = True # debug, 동기방식으로 실행
2) API 호출 방법
- apply_async(args[, kwargs[, ...]]) : 기본적인 호출방법, 다양한 옵션을 사용한 설정이 가능
- delay(*args, **kwargs) : 보다 쉽게 사용하기 위한 숏컷 방법
- calling (__call__) : 큐를 사용하지 않고 일반 함수처럼 호출 가능
- 호출 예시
# task.py
from celery import shared_task


@shared_task
def add(x, y):
    return x + y

# 호출
from worker.tasks import add

# 비동기 호출
add.delay(2, 2)

# 비동기 호출
add.apply_async((2, 2))

# 비동기 호출
add.apply(async((2, 2), queue='lopri', countdown=10)

# 직접 호출
add(2,2)
3) 비동기 작업의 반환 설정
- 참고 페이지 : https://docs.celeryq.dev/en/stable/reference/celery.result.html
- 반환 값
res = add.delay(2, 2)
res.get(timeout=1) #결과 값을 가져오는데 1초이상 걸리면 timeout을 동작함
# 4

res.id
# d6b32ase23-dsfa.....

res.failed()
# True

res.successful()
# False

res.state
# 'FAILURE'
- 에러 핸들링
res = add.delay(2, 2)
res.get(timeout=1)
"""
Traceback (most recent call last):
...
	File "vine/promises.py", line 244 inthrow
    	reraise(type(exc), exc, tb)
    File "vine/five.py", line 195, in reraise
    	raise value
TypeError: unsupported operand type(s) for +: 'int' and 'str'
"""

res.get(propagate=False) # 에러의 마지막 줄만 출력함
"""
TypeError: unsupported operand type(s) for +: 'int' and 'str'
"""
2. Standalone Celery, 독립형으로 셀러리 실행하는 방법
1) dockerfile, docker-compose 만들기
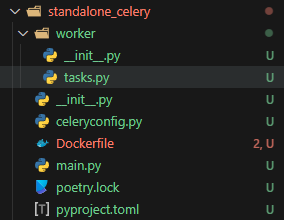
- standalone_celery 폴더를 생성하고 아래 이미지와 같은 구조를 만든다.
- dockerfile에 사용될 poetry 관련 파일이나 requirements.txt를 이동시켜 둔다.
- 상위 경로를 정의해 이미 존재하는 파일을 사용할 수도 있다.
- gunicorn dockerfile
FROM python:3.11.1

ENV PYTHONUNBUFFERED 1

ARG DEV=false

COPY pyproject.toml /app/
COPY poetry.lock /app/
COPY app /app/

WORKDIR /app
RUN pip install --no-cache-dir poetry
RUN poetry config virtualenvs.create false
RUN poetry install --no-root

# RUN if [ $DEV = true ]; then poetry install --no-dev
# RUN if [ $DEV = true ]; then poetry install --E redis

EXPOSE 8000

CMD ["gunicorn", "-b", "0.0.0.0:8000", "app.wsgi"]
- celery dockerfile
FROM python:3.11.1

ENV PYTHONUNBUFFERED 1

ARG DEV=false

COPY pyproject.toml /app/
COPY poetry.lock /app/
COPY app /app/

WORKDIR /app
RUN pip install --no-cache-dir poetry
RUN poetry config virtualenvs.create false
RUN poetry install --no-root
- celery-standalone이 추가된 docker-compose
version: "3.9"

services:
  app:
    build:
      context: .
      args:
        - DEV=true
    ports:
      - "8000:8000"
    volumes:
      - ./app:/app
    depends_on:
      - redis
    command: >
      sh -c "
        python manage.py makemigrations &&
        python manage.py migrate &&
        python manage.py runserver 0.0.0.0:8000
      "

  redis:
    image: redis:latest

  celery:
    build:
      context: .
    volumes:
      - ./app:/app
    command: celery --app=worker worker -l INFO
    # command: celery --app=worker worker -l INFO -P gevent  # for windows
    depends_on:
      - redis

  celery-standalone:
    build:
      context: standardalone_celery
    volumes:
      - ./standalone_celery:/app
    command: celery --app=main worker -l INFO
    depends_on:
      - redis
- main.py에서 celery와 관련된 설정을 한다.
- broker와 backend는 두가지 방법이 있다.
1. app 생성시 모든 정보를 정의하는 방법
2. app.config_from_object()를 사용해 정의 파일을 호출하는 방법
from celery import Celery

app = Celery(
    "worker",
    broker="redis://redis:6379/0",
    backend="redis://redis:6379/0",
    include=["worker.tasks"],
)

# app = Celery('worker',
#              include=['worker.tasks'])

# app.config_from_object('celeryconfig')

if __name__ == "__main__":
    app.start()
- 옵션) celeryconfig.py
broker_url = "redis://redis:6379/0"
result_backend = "redis://redis:6379/0"
- worker의 tasks에 작업을 정의한다. 이 때 경로는 django의 celery와 동일한 경로를 사용해야 celery가 작업을 찾는 과정에 충돌이 발생하지 않는다. 작업 경로의 기준은 항상 django의 celery가 된다는 것을 알고 있어야 한다.
from ..main import app


@app.task
def add(x, y):
    return x + y


@app.task
def mul(x, y):
    return x * y


@app.task
def xsum(numbers):
    return sum(numbers)
- celery 테스트
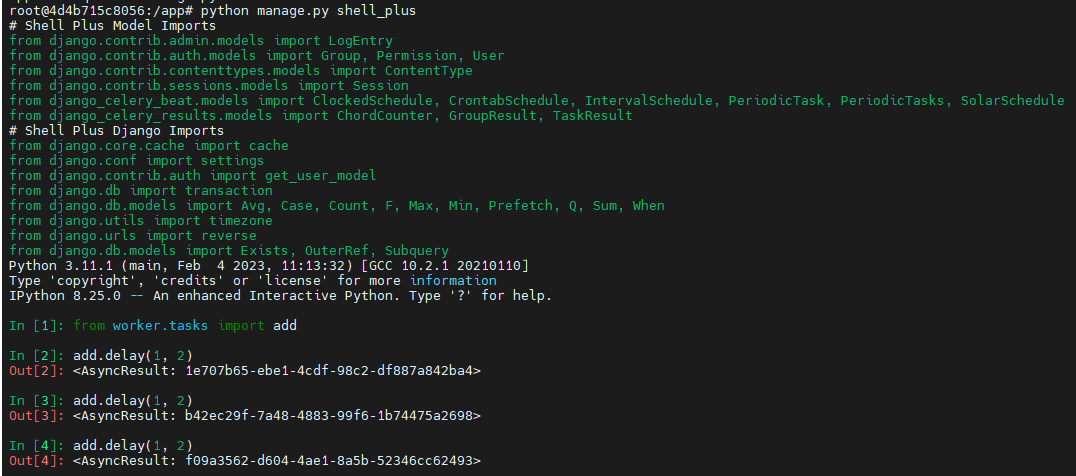
- app 컨테이너에 접속해 django의 shell을 실행한다
- shell plus는 추가로 설치해야 하는 패키지이다.
- add.deley를 여러번 수행한다.
- 아래와 같은 로그 결과를 각 celery 컨테이너에서 확인할 수 있다.
- Celery는 기본적으로 Fair Sharing 방식을 사용한다. 이는 작업이 들어오면 가장 빨리 사용 가능한 worker가 해당 작업을 가져가는 방식으로 모든 worker가 균등하게 작업을 처리할 수 있게 동작한다.

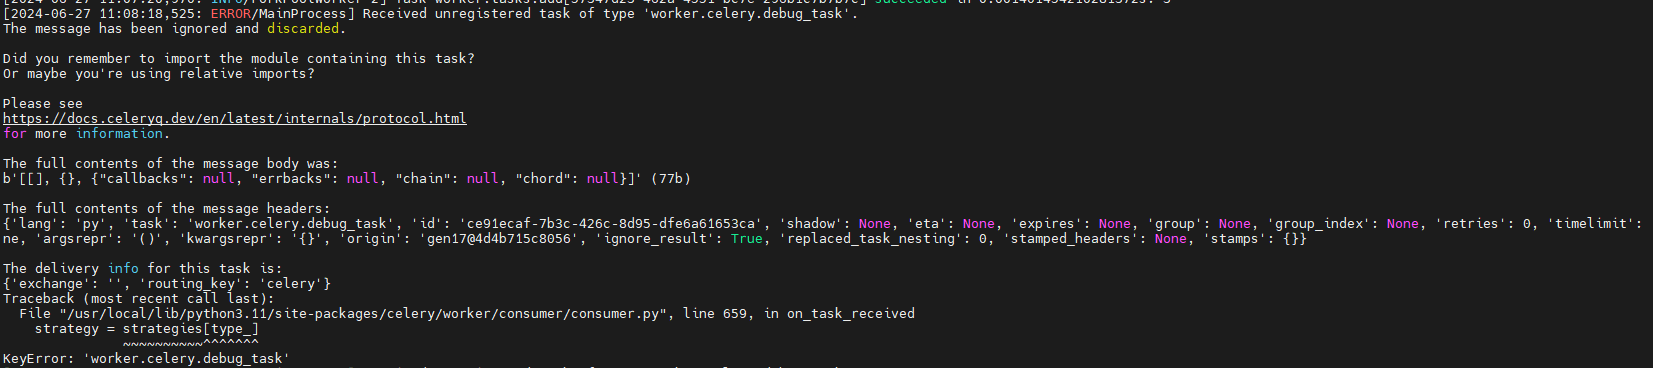
- django의 celery의 tasks.py 경로와 독립형으로 동작하는 celery의 tasks.py의 경로와 파일이 동일해야 한다. 만약 다른 경우라면 django의 celery가 작업을 가져가는 경우 문제 없이 동작 하지만, 독립형 celery의 경우 아래와 같은 에러가 발생한다.
- debug_task().delery()를 수행할 경우 독립형 celery에 아래와 같은 에러가 발생한다.
3. Task Routing
- 참고 페이지 : https://docs.celeryq.dev/en/stable/userguide/routing.html
- 여러개의 큐 중 어떤 큐에 작업을 넣을 것이고 이 작업을 어떤 worker node가 수행할 것인지 정의하는 것
- 사용시의 장점 :
- load balancing : 부하나 수용력 기반으로 다른 worker들에게 작업을 배포한다.
- resource allocation : cpu나 메모리 등 자원을 기반으로 작업을 배포한다.
- priority handling : 우선권 작업을 수행할 수 있다.
- isolation : organization, monitoring, troubleshooting 을 위해 작업의 다른 속성에 따라 분리할 수 있다.
1) 코드 구현
- docker-compose에 -Q queue1, -Q queue2를 각각 추가한다.
version: "3.9"

services:
  app:
    build:
      context: .
      args:
        - DEV=true
    ports:
      - "8000:8000"
    volumes:
      - ./app:/app
    depends_on:
      - redis
    command: >
      sh -c "
        python manage.py makemigrations &&
        python manage.py migrate &&
        python manage.py runserver 0.0.0.0:8000
      "

  redis:
    image: redis:latest

  celery:
    build:
      context: .
    volumes:
      - ./app:/app
    command: celery --app=worker worker -l INFO -Q queue1
    # command: celery --app=worker worker -l INFO
    # command: celery --app=worker worker -l INFO -P gevent  # for windows
    depends_on:
      - redis

  standalone_celery:
    build:
      context: standalone_celery
    volumes:
      - ./standalone_celery:/app
    command: celery --app=main worker -l INFO -Q queue2
    # command: celery --app=main worker -l INFO
    depends_on:
      - redis
- celery의 config 설정 추가
- update를 이용한 방법
# routing 첫번째 방법
app.conf.update(
    worker_concurrency=4,  # worker 개수를 4개로 설정
    task_routes={
        "worker.tasks.dumb": {"queue": "queue1"},
        "worker.tasks.add": {"queue": "queue2"},
    },
)
- task_routes를 이용한 방법
# routing 두번째 방법
app.conf.task_routes = {
    "worker.tasks.dumb": {"queue": "queue1"},
    "worker.tasks.add": {"queue": "queue2"},
}
- 정규 표현식 사용방법
# you can use glob pattern matching, or even regular expressions,
# to match all tasks in the feed.tasks name-space
app.conf.task_routes = {'feed.tasks.*': {'queue': 'feeds'}}

# If the order of matching patterns is important you should specify
# the router in items format instead:
task_routes = ([
    ('feed.tasks.*', {'queue': 'feeds'}),
    ('web.tasks.*', {'queue': 'web'}),
    (re.compile(r'(video|image)\.tasks\..*'), {'queue': 'media'}),
],)
- celery 시작시 출력되는 기본 정보 중 queues 항목에서 할당받은 queue 정보를 확인할 수 있다.
- 아래 이미지는 django celery의 컨테이너 로그이기 때문에 queue1만 확인이 된다.

- dumb.delay() 실행시 queue1의 celery에서만 로그 출력이 된다.

- add.delay(1, 2) 실행시 queue2의 celery에서만 로그 출력이 된다.

4. Priority Queue, 우선 순위 큐
- 참고 페이지 : https://docs.celeryq.dev/en/stable/userguide/routing.html#redis-message-priorities
- 사용시의 장점 :
- Handling Urgent Tasks Efficiently : 긴급한 작업의 우선 처리가 가능함
- Resource Management : 일부 작업은 리소스 집약적일 수 있으며 제대로 관리되지 않으면 잠재적으로 다른 작업의 처리 속도가 느려질 수 있다. 이런 경우 관리가 가능하다.
- Load Balancing : 가벼운 작업과 무거운 작업이 같이 있을 경우 관리할 수 있다.
- Meeting Deadlines adn SLAs : 비즈니스 애플리케이션에서는 service level agreements(SLAs)나 마감일을 준수하는 것이 중요하다. 이런 경우 조절을 위해 사용할 수 있다.
- Improved User Experience : 사용자에게 좋은 서비스를 제공하기 위한 처리 방법으로 사용할 수 있다.
- Scalability : 확장성
- Contingency Handling : 시스템 문제가 발생하여 recovery를 시도할 경우, 우선 순위 처리 과정에 사용할 수 있다.
- Cost Efficiency : 예를 들어 클라우드 서비스 중 시간대에 따라 가격이 저렴할 때가 있다. 이런 때 적절한 작업을 할당하여 처리할 수 있다.
1) 설정 방법
- celery 설정
app.conf.broker_transport_options = {
    'queue_order_strategy': 'priority',
}
- 위와 같이 설정하는 경우 자동으로 아래와 같이 4개의 큐가 생성된다.
['celery', 'celery\x06\x163', 'celery\x06\x166', 'celery\x06\x169']
- 만약 임의의 갯수만큼 생성하고 싶다면 아래와 같이 사용할 수 있다.
- sep 기본은 ','이다. 호환성 문제로 sep은 정의하지 않는걸 추천한다고 강의 내용에도 있다.
app.conf.broker_transport_options = {
    'priority_steps': list(range(10)),
    'sep': ':',
    'queue_order_strategy': 'priority',
}
- 이런 경우 생성되는 큐는 아래와 같다.
['celery', 'celery:1', 'celery:2', 'celery:3', 'celery:4', 'celery:5', 'celery:6', 'celery:7', 'celery:8', 'celery:9']
2) 사용 방법
- docker-compose
- standalone_celery는 주석 처리를 하고 command 항목을 수정한다.
version: "3.9"

services:
  app:
    build:
      context: .
      args:
        - DEV=true
    ports:
      - "8000:8000"
    volumes:
      - ./app:/app
    depends_on:
      - redis
    command: >
      sh -c "
        python manage.py makemigrations &&
        python manage.py migrate &&
        python manage.py runserver 0.0.0.0:8000
      "

  redis:
    image: redis:latest

  celery:
    build:
      context: .
    volumes:
      - ./app:/app
    command: celery --app=worker worker -l INFO -Q celery,celery:1,celery:2
    # command: celery --app=worker worker -l INFO -Q queue1
    # command: celery --app=worker worker -l INFO
    # command: celery --app=worker worker -l INFO -P gevent  # for windows
    depends_on:
      - redis

  # standalone_celery:
  #   build:
  #     context: standalone_celery
  #   volumes:
  #     - ./standalone_celery:/app
  #   command: celery --app=main worker -l INFO -Q queue2
  #   # command: celery --app=main worker -l INFO
  #   depends_on:
  #     - redis
- celery.py에 conf 수정
app.conf.broker_transport_options = {
    "priority_steps": list(range(10)),  # default is 4
    "sep": ":",
    "queue_order_strategy": "priority",
}

"""
['celery', 'celery:1', 'celery:2', 'celery:3', 'celery:4', 'celery:5', 'celery:6', 'celery:7', 'celery:8', 'celery:9']
"""
- tasks.py에 작업 추가
@shared_task(queue="celery")
def p1():
    time.sleep(5)


@shared_task(queue="celery:1")
def p2():
    time.sleep(5)


@shared_task(queue="celery:2")
def p3():
    time.sleep(5)
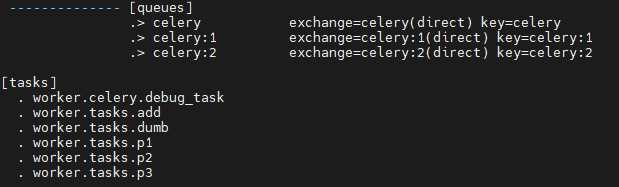
- celey 실행시 아래와 같이 큐와 작업을 확인할 수 있다.
5. Task Grouping, 테스크 그룹핑
- 여러개의 task들을 그룹화 하여 병렬로 실행하는 방법
- 사용시의 장점 :
- Concurrent Excution : 동시적으로 수행하여 performance 향상
- Workflow Management : workflow를 만들어 복잡한 task plan 진행 가능
- Efficiency : 수행 시간 단축
- Flexibility : 복잡한 비지니스 로직에 여러개의 workflow가 있는 경우 해결 가능
- 기본 단위 :
- group : 여러 개의 작업(task)을 병렬로 실행할 수 있게 해준다.
- 만약 args 외 kwags를 s를 이용한 숏컷으로 이용하려면 아래와 같이 사용하면 된다.
- add.s(2,2,key1="test1",key2="test2")
from celery import group

tasks = [
    add.s(2, 2),
    add.s(4, 4),
    add.s(8, 8),
]
result = group(tasks)()
- chain : 작업들을 순차적으로 실행할 수 있게 해준다. 이전 작업의 결과값이 다음 작업의 입력값으로 전달된다.
from celery import chain

tasks = [
    add.s(2, 2),
    mul.s(4),
    sub.s(3),
]
result = chain(tasks)()
- chord : chord는 병렬로 실행된 작업들의 결과를 모아서 콜백을 이용해 새로운 작업을 실행할 수 있게 해준다. 먼저 병렬로 실행되는 작업들이 있고, 이 작업들이 모두 완료되면 콜백 함수가 실행된다.
from celery import chord

tasks = [
    add.s(2, 2),
    mul.s(4, 4),
    sub.s(8, 3),
]
callback = xsum.s()
result = chord(tasks)(callback)
- starmap : starmap은 작업들의 인자를 튜플 형태로 전달할 수 있게 해준다. 각 작업은 튜플의 각 요소를 개별 인자로 받게 된다.
from celery import starmap

tasks = [
    (add, (2, 2)),
    (mul, (4, 4)),
    (sub, (8, 3)),
]
result = starmap(tasks)()
- 강의 실습용 command (수업노트 github의 celery 항목에 있음)
- 연습을 위해서 docker에 진입 후 shell, shell_plus로 테스트함
```
# Group
from celery import group, signature
from worker.tasks import add, xsum

job = group(signature('worker.tasks.add', args=(i, i)) for i in range(10))
result = job.apply_async()

job = group(add.s(i, i) for i in range(10))
result = job.apply_async()
"""
<GroupResult: 10c0dfa3-489b-4a86-a101-90ac77b2e64f [e500072b-214d-48a4-adc6-f212d5859a11, 10622db4-b849-464e-a067-8e2e0f83d849, 762a60e6-d2c5-42f0-b150-a5868834e0bf, cefc7e86-6ba1-42d1-8471-a4728c9eb304, 8d0221ff-432e-4498-bcd5-7c7ce7825b02, 1e4f76bb-22fa-4a3a-ba9c-ec8b0cc205c7, 3db0dcd9-3807-45a2-80fe-cdaa1101feaf, be94d86e-2a6f-4596-b068-8f2c6b3895f7, ba61b0c9-c434-427a-8d06-8e18529b94e9, 631c3ce0-7c92-4c53-af31-ff38ea78ce0f]>
"""
result.get()
# [0, 2, 4, 6, 8, 10, 12, 14, 16, 18]


# Chain
from celery import chain

workflow = chain(add.s(2, 2), add.s(4), add.s(8))
result = workflow.apply_async()
result.get()
# 16


# Chord
from celery import chord

callback = xsum.s()
header = [add.s(i, i) for i in range(10)]
result = chord(header)(callback)
result.get()
# 90


# Starmap
result = add.starmap(zip(range(10), range(10))).apply_async()
result.get()
[0, 2, 4, 6, 8, 10, 12, 14, 16, 18]
6. Task Rate Limit, 테스크 병렬성 제한
- Task rate limit은 Celery에서 작업(task) 처리 속도를 제한하는 기능이다.
1. 시스템 리소스 관리: 작업 처리 속도를 제한함으로써 시스템 CPU, 메모리, 네트워크 등의 리소스 사용을 효율적으로 관리할 수 있다. 이는 시스템 과부하를 방지하고 전체 성능을 향상시킬 수 있다.
2. 부하 제어: 시스템에 가해지는 부하를 적절히 제어할 수 있다. 예를 들어, 특정 작업이 과도한 리소스를 사용하거나 병목 현상을 일으킬 경우 해당 작업의 처리 속도를 낮출 수 있다.
3. 서비스 안정성: 작업 처리 속도 제한을 통해 시스템의 안정성을 보장할 수 있다. 급격한 작업 증가로 인한 시스템 과부하를 방지할 수 있다.
4. 공정성 유지: 특정 작업이 시스템 자원을 독점하지 않도록 제한하여 다른 작업들의 공정한 처리를 보장할 수 있다.
- Celery에서는 rate_limit 옵션을 사용하여 작업 처리 속도를 제한할 수 있다. 이 옵션을 통해 초당 처리 가능한 작업 수, 분당 처리 가능한 작업 수 등을 지정할 수 있다. 이를 통해 시스템 리소스를 효율적으로 관리하고 안정적인 시스템 운영을 보장할 수 있다.
1) 사용 방법
1. Task Rate Limit:
- 정의 number/time_unit
- rate_limit 옵션을 사용하여 작업의 처리 속도를 제한할 수 있다.
- 예: @task(rate_limit="10/m"): 초당 10개의 작업을 처리할 수 있다.
2 .Worker Rate Limit:
- worker_ratelimit 옵션을 사용하여 작업자 별 처리 속도를 제한할 수 있다.
- 예: celery -A proj worker --worker-ratelimit=10 : 각 작업자는 초당 10개의 작업을 처리할 수 있다.
3. Concurrency Limit:
- concurrency 옵션을 사용하여 작업자의 최대 동시 실행 작업 수를 제한할 수 있다.
- 예: celery -A proj worker --concurrency=10 : 각 작업자는 최대 10개의 작업을 동시에 실행할 수 있다.
4. Prefetch Limit:
- prefetch_multiplier 옵션을 사용하여 작업자가 미리 가져올 수 있는 작업 수를 제한할 수 있다.
- 예: celery -A proj worker --prefetch-multiplier=1 : 작업자는 1개의 작업만 미리 가져올 수 있다.
5. celey.py 파일에 설정하는 방법
app.conf.task_default_rate_limit = '5/m' # 5 tasks per minute
7. Task with Positional and Keyword arguments, 위치 및 키워드 인수가 포함된 작업
- 호출 :
print_result.apply_async(args=[1,2], kwargs={"msg: 'The result is"})
- task 정의 :
@shared_task(queue="celery")
def print_result(x, y, msg=None):
    total = x + y
    if msg:
        return f"{msg}: {total}"
    return total
8. Synchronous vs Asynchronous Task, 동기화와 비동기화
1) Synchronous (동기식) :
- Blocking Execution
- Direct Flow
- Resource Utilization : process needs to be active all the time
- Error Handling : Exception can be handled where the call is made
2) Asynchronous (비동기식) :
- Non-blocking Execution
- Concurrency: Improving efficiency, especially for I/O-bound or network-bound operations.
- Decoupled Process: The task execution is decoupled from the calling process
- Error Handling: call back is required
- 참고 페이지 : https://docs.celeryq.dev/en/stable/reference/celery.app.task.html
- celery의 apply()와 apply_sync() 비교
- 차이점 요약:
- apply(): 동기적으로 작업을 실행하며, 작업이 완료될 때까지 프로그램 실행이 중지된다.
- apply_async(): 비동기적으로 작업을 실행하며, 작업을 큐에 넣고 즉시 반환한다.
- apply()
- apply()는 동기적으로 작업을 실행한다.
- 작업이 완료될 때까지 프로그램 실행이 중지된다.
- 작업 결과를 즉시 반환한다.
- 주로 간단하고 빠른 작업에 적합하다.
- 이 예시에서는 add 함수를 apply() 메서드를 사용하여 동기적으로 실행한다. 작업이 완료될 때까지 프로그램 실행이 중지되며, 작업 결과를 즉시 반환한다.
from celery import Celery

app = Celery('tasks', broker='amqp://guest:guest@localhost:5672//')

@app.task
def add(x, y):
    return x + y

# 동기적으로 작업 실행
result = add.apply(args=[4, 4])
print(result.get())  # 출력: 8
- apply_async()
- apply_async()는 비동기적으로 작업을 실행한다.
- 작업을 큐에 넣고 즉시 반환한다.
- 작업 결과는 AsyncResult 객체를 통해 나중에 확인할 수 있다.
- 주로 오래 걸리는 작업, 배치 처리, 백그라운드 작업 등에 적합하다.
- 이 예시에서는 add 함수를 apply_async() 메서드를 사용하여 비동기적으로 실행한다. 작업이 큐에 넣어지고 즉시 AsyncResult 객체가 반환된다. 이후 get() 메서드를 호출하여 작업 결과를 확인할 수 있다.
from celery import Celery

app = Celery('tasks', broker='amqp://guest:guest@localhost:5672//')

@app.task
def add(x, y):
    return x + y

# 비동기적으로 작업 실행
result = add.apply_async(args=[4, 4])
print(result.get())  # 출력: 8
9. Signal에 대해
- 참고 페이지 : https://docs.celeryq.dev/en/stable/userguide/signals.html
- signal은 셀러리 애플리케이션 내의 특정 이벤트나 트리거에 대한 응답으로 작업을 수행하는 데 사용된다.
- signal을 사용하면 작업 실행 수명 주기의 다양한 지점에 연결하고 custom logic을 실행할 수 있다.
1) signal 테스트
- 모든 task에 출력하는 signal과 add task 작업시에만 출력하는 signal을 정의함
# Define signal handlers
@task_prerun.connect
def task_prerun_handler(sender, task_id, task, args, kwargs, **kwargs_extra):
    print(f"Task {task_id} it about to run : {task.name} with args {args}")


@task_postrun.connect
def task_postrun_handler(
    sender, task_id, task, args, kwargs, retval, state, **kwargs_extra
):
    print(f"Task {task_id} has completed : {task.name} with result {retval}")


# Define signal handlers using sender
@task_prerun.connect(sender=add)
def task_prerun_handler_add(sender, task_id, task, args, kwargs, **kwargs_extra):
    print(f"Task {task_id} it about to run : {task.name} with args {args}")


@task_postrun.connect(sender=add)
def task_postrun_handler_add(
    sender, task_id, task, args, kwargs, retval, state, **kwargs_extra
):
    print(f"Task {task_id} has completed : {task.name} with result {retval}")


# simulating task signal
def simulating_task_signal():
    # call the celery task asynchronously
    result = add.delay(2, 3)  # type: ignore

    # Get the result of the task
    final_result = result.get()
    print("Final Result:", final_result)
- app 컨테이너에서 shell_plus로 simulating_task_signal() 호출
In [1]: from worker.tasks import simulating_task_signal

In [2]: simulating_task_signal()
Final Result: 5
- celery에서의 결과 화면

- reference :
[Celery]window에서 celery task가 실행되지 않는 문제
문제 Celery와 RabbitMQ를 통해 비동기 Task queue를 사용하여 알람을 생성하는 task들을 실행하였다. 경기 참여자들에게 전송할 알람을 생성하기 위한 createalarms() task와 알람을 삭제하기 위한 deletealarm()
velog.io
'Study > django' 카테고리의 다른 글
| [인프런] 실리콘밸리 엔지니어와 함께하는 샐러리(Celery) 학습 정리 3 (0) | 2024.07.07 |
|---|---|
| [인프런] 실리콘밸리 엔지니어와 함께하는 샐러리(Celery) 학습 정리 2 (1) | 2024.06.30 |
| [DRF] fcm-django-web-demo를 이용한 fcm 테스트 정리 (0) | 2024.03.09 |
| [DRF] FCM 관련 Django 라이브러리 정보 정리 (0) | 2024.03.09 |
| [DRF] Django with FCM - firebase push message 자료 정리 (1) | 2024.03.09 |
댓글